Here is an example of a fan coil application with three speed fan and a modulating cooling valve. Note that this is for the ‘configurable’ Tstat8, not the ‘programmable’ Tstat10.
There is a lot going on in this example but once you get the hang of this, configuring stats is quick and the configuration can be copied to other devices easily.
First step is to give the outputs a name, this will make things easier to relate to in the later setup screens. Navigate to the outputs screen at Tab1 and type in the names of the outputs at Tab2. The ranges at Tab3 can be left at their defaults, output 6 will be the modulating cooling valve. If you have an on-off cooling valve you could wire it to relay 4 and give it a name there instead.

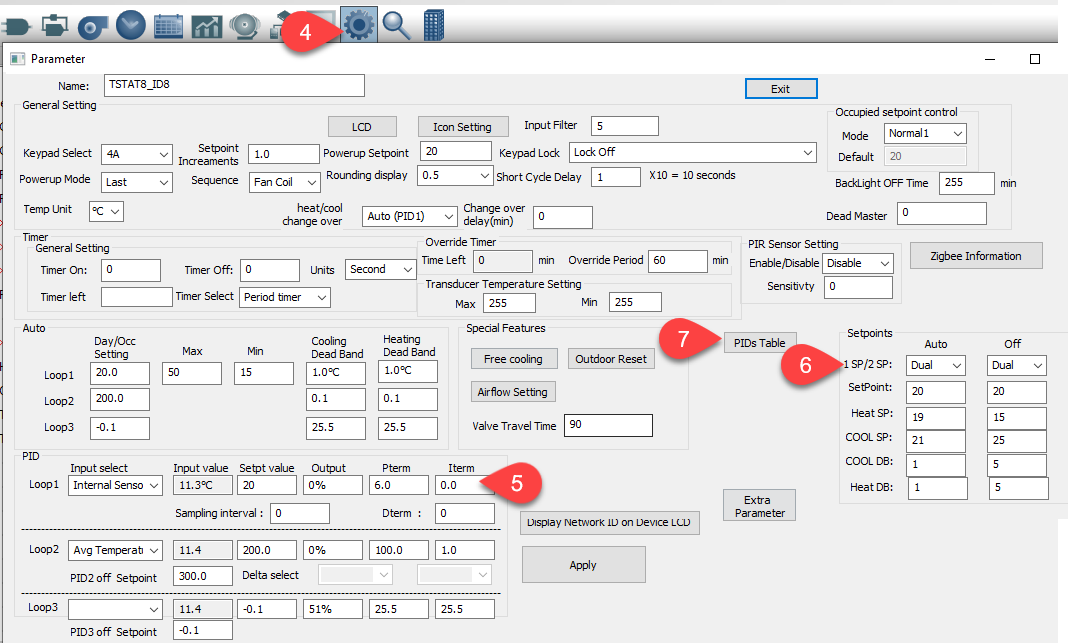
Navigate to the advanced settings page at Tab4 and fill in the PID terms at Tab5 you can leave them at their defaults normally. I have temporarily set the I term to zero which will make commissioning go smoother, once you have a working config file you can introduce a little I term which works to kick the system into the next stage even with small deviations.
At Tab6 you configure the setpoints, ‘dual’ setpoints just allows you to separately adjust the heating and cooling setpoint like you see on a home air conditioning unit. The single setpoint makes things simpler for the user where they will see only one ‘setpoint’ on the thermostat keypad, this is useful in commercial settings. You can enter setpoints and the deadbands will adjust automatically or vice versa. In between the heating and cooling setpoints the system will be in ‘coasting’ mode which saves energy and reduces short cycling, the bigger you can make your deadbands the better.
Now click on the PID table at Tab7, this is where we set up which output will be on for each of the stages of heating and cooling.
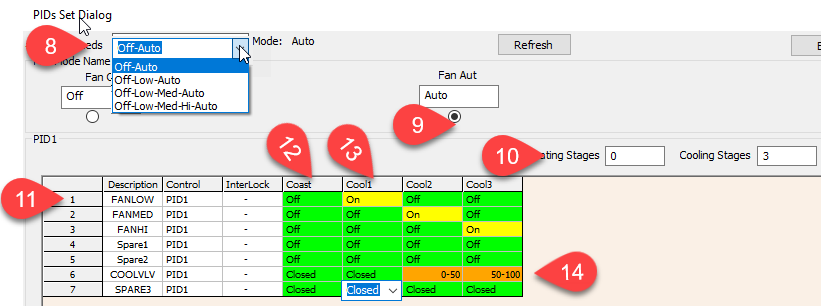
The PID table dialog is quite busy but offers a lot of flexibility and once you know the basics, the next project will go quickly. Tab8 lets you select how many modes there will be in the system, to keep things simple I will set up just two modes, Auto and Off but you could create up to 5 modes like low, medium high, away, vacation, unoccupied and so on, these can be renamed on this dialog as well.
Select the Auto Mode by clicking the radio button at Tab9 to let us configure the Auto table first. Type in the number of stages of heating and cooling at Tab10, in this example we have no heating and three stages of cooling. Each row of the table at Tab11 represents one output and each column represents one stage. So at the intersection of Tab11 row1 for the low speed fan, go to the right to column 13 and set the low speed fan to be on in cooling stage 1 and off for all the other columns. Do the same for the medium and high speed outputs in rows 2 and 3. Finally set up what the cooling valve in row6, I have arbitrarily set it to modulate from 0-50 in stage2 cooling when the medium speed fan is on and modulate from 50 to 100% when the high speed fan is on. You can tailor it differently however there’s only three options for a given stage: 0-50, 50-100 and 0-100%
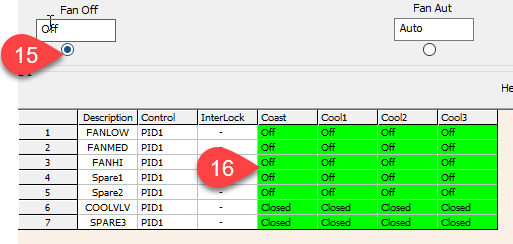
Final step is to configure what the outputs will do in the OFF mode, in this example I have set everything to just go off. In a residential application you would want to maintain the night setpoints so you’d copy the table from the Auto mode here. Then the system would operate like the daytime Auto mode but maintaining the night setpoints.