This Tutorial shows how to read and write a Digital I/O from a Temco T3-8o Expansion i/o using Raspberry Pi Compute Module 3+. It could also be used with any other Temco or other BacNET/Modbus devices.
In order to create or use this flow node-red-contrib-modbus must be installed.
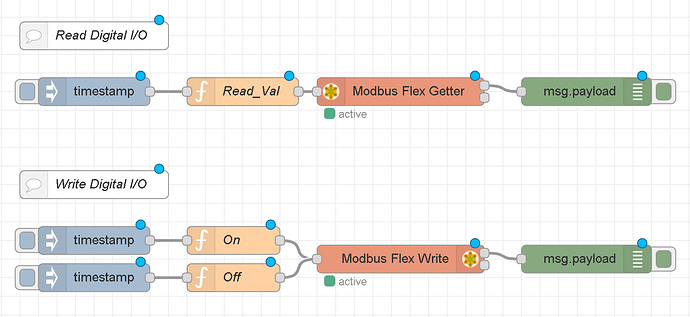
The flow for this tutorial (attached) - looks like this;
First I will describe each node for the Read Example.
The Inject node is set up to trigger the reading of the value - can be configured as Timestamp, Number or String.
The next node is a Function which sets the values for the ‘ModBus Getter’ Node.
msg.payload = {
‘fc’ : 3,
‘unitid’ : 254,
‘address’ : 108,
‘quantity’ : 1
};
return msg;
The first value is for the ModBus Flex Getter Function Code - currently supported Codes are;
- FC 1: Read Coil Status
- FC 2: Read Input Status
- FC 3: Read Holding Registers
- FC 4: Read Input Registers
The ‘unitid’ is the Address ID of the Expansion I/O - this can currently only be changed using T3000 software.
The ‘address’ is the ‘RegAddress’ of the Register that you want to retrieve. In order to view the list of Register Addresses for your device use T3000 software Tools>Register Viewer. In this case we are reading the value of the DO1 Register which is at Register Address 108 and has a Length of 1
The ‘quantity’ is the number of values to retrieve - Also seen in the Register Viewer ‘Reg_Length’.
The next Node is the ‘Modbus Flex Getter’ - this is where the connection to the device is configured. Please see my other tutorial on reading Analog Values for the information on how to configure this node - Modbus-TCP Read Analog IO Tutorial.
The final node is a Debug node that simply outputs the value of the Digital I/O to the Debug window - in this case either 0 for off or 1 for on.
For the Write Digital I/O part of this flow - first there are 2 Inject and Function nodes that trigger the IO either on or off.
The Function nodes are similar to the Read functions above - except there is one additional ‘value’ for the value that will be written.
msg.payload = {
‘value’ : 1,
‘fc’ : 6,
‘unitid’ : 254,
‘address’ : 108,
‘quantity’ : 1
};
return msg;
In this case the value 1 turns on the Digital I/O, and of course 0 would turn it off. The Function Codes for the ‘Modbus Flex Write’ are as follows;
Function codes currently supported include:
- FC 5: Force Single Coil
- FC 6: Preset Single Register
- FC 15: Force Multiple Coils
- FC 16: Preset Multiple Registers
The unitid, address and quantity are the same as in the read example above
The 'Modbus Flex Write configuration options are the same as the Getter.
And the Debug Node also simply outputs the msg.payload to the debug window - ie.

This flow can be downloaded from the included attachment.
modbus_read_write_digital_io.json (3.1 KB)
