I wasn’t able to repeat the issue but you could check the range setting at tab4 here in the outputs grid. If its left at the default of unused it may give you problems.
I created a program with your logic and a slightly improved version and both are turning the output on & off as expected. I took the liberty of renaming the IO to make things easier to follow.
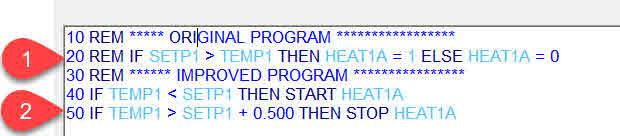
Your program is at line 10 and has been commented out for now. My program at line 40 & 50 does the same thing in two lines, I find its easier to troubleshoot and clearer to understand years later if there’s one action per line, plus there’s plenty of programming space in these controllers. Next notice I’ve flipped the compare statement around, it reads easier if you compare the changing room temperature to the ‘fixed’ setpoint rather than the other way around. If the temp is lower than the setpoint turn on the heat, if the temp is higher than the setpoint turn off the heat.
Also notice in line 50 I added a deadband, the room temp has to be over the setpoint plus a deadband of 0.5F Deg. This reduces the chance for chattering on the output when the temperature is hovering close to the setpoint, you can adjust it in the program if 0.5 is too small. And finally notice I used the STOP and START keywords which are more intuitive, it makes things easier for the person checking this program ten years from now.
May as well point out some tips I used when investigating this issue:
I used the manual feature to simulate low and high temps on the input, that way I didn’t have to actually install a sensor on the input to test the program. At tab3 is where you do that, set this to manual and you can type in any temperature you like for the room temp.
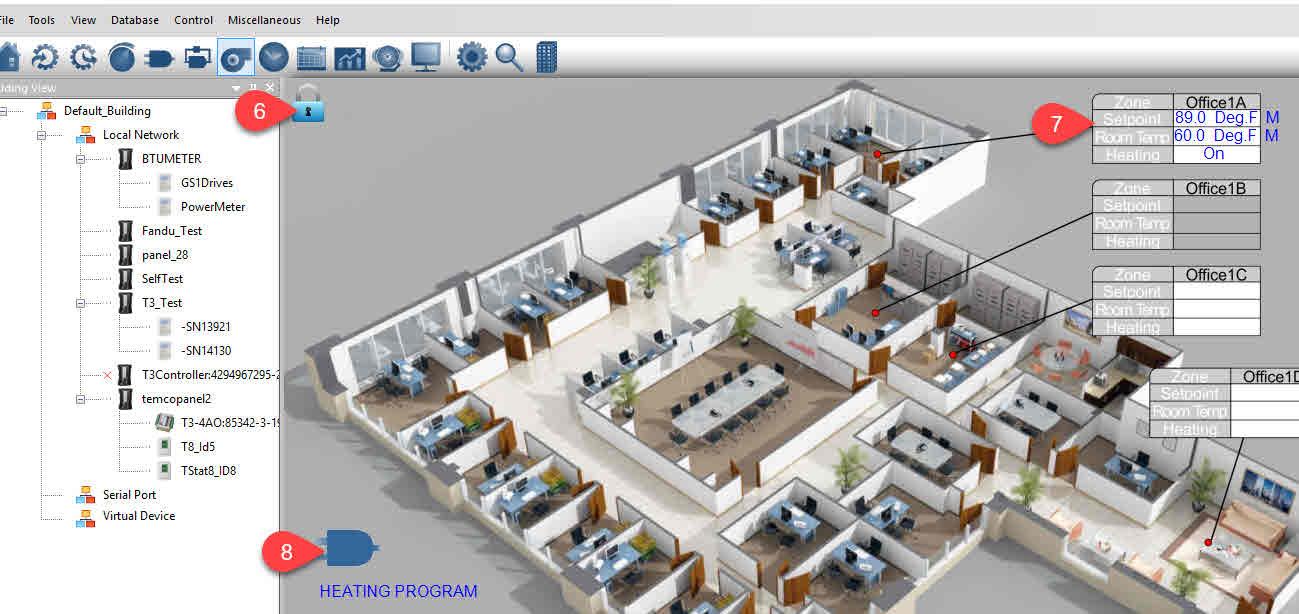
I also created a graphical display for all the inputs, outputs, variables and the program into one screen. This lets me adjust the room temp and see the results quickly without having to jump around from the INPUTS screen to the OUTPUTS screen and back to check things. To create the graphical screen I first gave the screen a name and associated a picture at tab 5 in the graphics screen grid. The ‘picture file’ is any jpeg or bitmap you have created for the project or it can be left blank for now and there would be a grey background. Hit the inset key on this row of the grid (tab5) to bring up the graphical display. Now you can and add the various real time elements: IN1, OUT1, VAR1 and so on. Make sure the lock symbol at tab6 is unlocked then hit the insert key and type in the ID of the point to be added. You can also refer to them as their given names, TEMP1, SETP1, HEAT1A
Move the elements around by clicking the mouse on them and position them on the graphic in this case over at tab7. I inserted a link to the program at tab8 so that everything, including the programming is accessible from this one screen. When you’re done lock the screen at tab6 to keep the elements from moving around and start your troubleshooting by adjusting the room temp and setpoint up and down in manual mode as shown by the "M” on the elements near tab7. When you are done set them back to auto and the M will disappear.
Here’s a link to the zip file containing the programming file and the graphic I created for this example, look for the “OfficeHeatingExample.zip” within the overall zip. You can load this program file to your controller to test it out:
https://temcocontrols.com/ftp/software/16ExampleProgFiles.zip
Feel free ask for more tips, I am using this as an excuse to finally build up some decent example files.
MD