Hello Maurice, I plan to install eight TStat8s on a job. Each will control a gas/electric rooftop 10ton packaged heater/air conditioner. I’ve successfully loaded the T3000 software on a laptop and can communicate with one Tstat8 that is hooked up on a test bench. Sweet!
Now I need to program the TStat8 to act like a standard 2H-2C Thermostat. I’ve renamed the first 5 outputs to be Fan, W2, W1, Y1 and Y2; and set the ranges as On/Off. In PID’s Set Dialog, I’ve chosen Heating Stages 2 and Cooling Stages 2 and programmed the PID1 loop accordingly.
But now I am stuck. In Occupied mode, I want to have the thermostat close W1 if the temp goes below 67 deg F and close both W1 and W2 if the temp goes below 65. I want the thermostat close Y1 if the temp goes above 73 deg F and close both Y1 and Y2 if the temp goes below 76. Where do I specify those setpoints? Thanks for any help you can give.
I’ll take the liberty of showing all the steps here for reference.
-
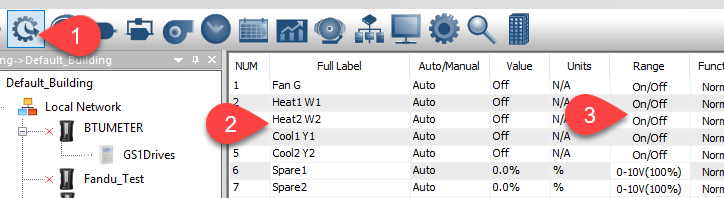
First click on the outputs icon to configure the outputs.
-
Give the outputs a name, here I went with fan, W1, W2, Y1, Y2 but you could go in any order you like.
-
Set the range to off-on, that’s the default setting so we’re done with this screen.
-
Click on the advanced settings icon
-
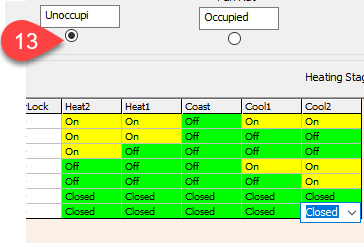
Then go to the PID table
-
Give each mode a name here, click on the Occupied radio button to see the output table for the occupied mode.
-
Here we select how many ‘modes’ you want, here we’ll only set up two for occupied and unoccupied modes but you could add more here such as ‘FAN’ if you wanted to let the user put the stat into a fan only circulation mode.
-
Enter the number of heating and cooling stages here.
-
Now set up the staging, each output is represented along one row of the table.
-
Each column represents a stage of heating, coasting or cooling. Columns to the left of the table show the state of the system in heating and cooling goes to the right.
-
Each cell represents the state of the output for each of the stages. If you wanted to run the fan in coasting mode (when the room temp is satisfied) you would turn the cell at tab11 to on.
-
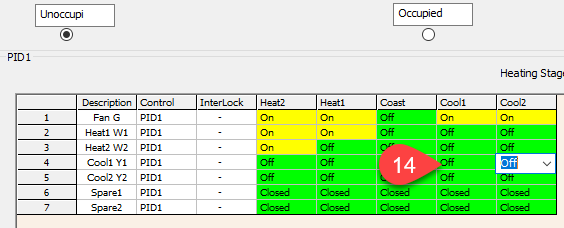
Set this whole row to PID1 since all outputs will be managed by one PID loop to maintain the room setpoint.
-
Now click on the unoccupied radio button. The table should be set up to look just like the table for the occupied mode, we’ll be maintaining setpoint for both heating and cooling modes at night, as in a residential application.
-
In a commercial building you’d disable the cooling at night as shown here, both rows for Y1 and Y2 are off in the cool1 and cool2 columns.

- Now for the PID loop, your max temp of 76 for full cooling and min temp of 65 for full heat is a difference of 9 Deg F for the full response. With PID the stages don’t come on exactly at a certain temperature but you can approximate your trip points by setting the P term in the PID1 loop to the nice even number of 8 just to keep things easier to explain, 2 Deg for heat1, 2 more for heat2 and the same for cooling, 2Deg for each stage. I also suggest leaving the I and D terms at zero during commissioning, later you may want to add a small bit of I term to kick the unit into action for small setpoint deviations over longer periods.

-
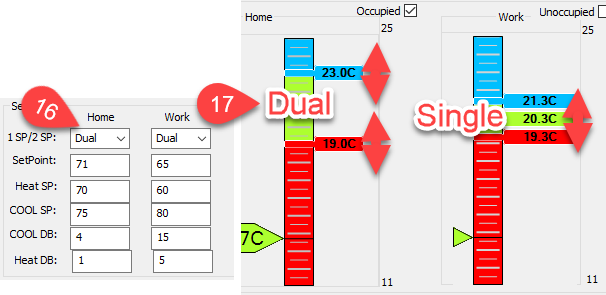
Finally the setpoints are set up here. The user interface needs some updating to make this more intuitive but Home means occupied and work means Unoccupied.This dialog needs some improvements as well.
-
‘Dual’ means you can independently adjust the heat and cool setpoints and ‘single’ means there’s only one setpoint with the heating and cooling setpoints calculated automatically using the deadbands.
-
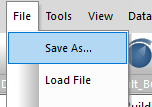
You can save the configuration for this stat by using the T3000 → File ->‘Save As’ function. The config can then be loaded into another device by connecting and going to the ‘Load File’ function. The config file for the above example has been saved along with some other config files in a zip file in the ftp folder, look for the item called 21ExampleTstatConfigs.zip
Index of /ftp/software/
Maurice, Thank you for your prompt and thorough reply which was very helpful. Then I went to your Bravo Software T3000 manual.pdf and read section 6.6 on PID loops which is really fantastic!
I understand that for each mode, I can choose either “Dual” or a “Single” setpoint(s). If I choose Dual, then I would set the Cooling Setpoint, the Cooling Deadband, the Heating Setpoint and Heating Deadband. In this case, is it true that the TStat8 will ignore the values in the “Setpoint” and “Deadband” boxes?
Similarly, I could choose Single and set the Setpoint and Deadband. Would the Tstat8 ignore the values in the Cooling Setpoint, Cooling Deadband, Heating Setpoint and Heating Deadband boxes?
I think you have the right idea and I can see we need to clear up the user interface a little to grey out the things which are automatically calculated in each of the two modes.
The stat is always using the heating and the cooling setpoints for the PID calculations, regardless of which setpoint mode you choose. Its just how its all presented to the user which is a little different, one slider versus two.
And here is an update:
The new Tstat10 is fully programmable and is destined to replace the Tstat8 over time. Consider using the Tstat10 for new projects. Here is a program file for a two heat/ two cool application done for the programmable Tstat10:
2Heat2CoolRev6.prog (65.0 KB)
And here is another update, an example on the Tstat10 with full explanation.